
I’ll say it: I’m a little bit of a crap baker. I’m impatient and prone to loosey-goosey measurements, which occasionally results in highly irregular baked goods. I also wasn’t raised in a baking family, so I missed a lot of the baking community’s semi-unspoken rules (fluffing your flour before use and spooning it into your measuring cup, for example). But between my work at The Takeout and a mid-pandemic investment in virtual baking classes like this one, I’ve become a lot more confident with my whisk. I spent most of 2020 tinkering with breads, cakes, and pies, most of which resulted in moderate success. But the entire time, I was haunted by my personal white whale: the perfect chocolate chip cookie.
The humble chocolate chip cookie seems so innocent. So straightforward. And yet the spectral cookie floated above my head as I spent 2020 mastering focaccia and meringue and buttermilk biscuits. “You want me,” the cookie taunted. “You want me so bad it’s like acid in your mouth.” So I tried. I made five or six batches of chocolate chip cookies over the course of last year, but the mischievous cookie magic slipped through my fingers time and time again. My cookies came out dry and crumbly, puffy and underbaked, or just plain ugly. I followed recipes to the letter, but I couldn’t achieve a consistent result. In my mind, the perfect cookie looked a lot like the one J. Kenji López-Alt sought in his exhaustive cookie experiment for Serious Eats. Kenji writes:
“I’m talking chocolate cookies that are barely crisp around the edges with a buttery, toffee-like crunch that transitions into a chewy, moist center that bends like caramel, rich with butter and big pockets of melted chocolate. Cookies with crackly, craggy tops and the complex aroma of butterscotch.”
That. That’s what I wanted. But while Kenji’s cookie experiment involved a host of variables, I focused on two: butter and aging. I then spent a week tweaking those variables and baking a grand total of 400 cookies. The result was a cookie that inspired one of my friends to label me “one of the most talented bakers [he’s] ever met,” which is total bullshit but a nice sentiment nonetheless. Compliments aside, my experiment gave me some much-needed confidence in a recipe I can replicate again and again.
The recipe
I needed a completely foolproof recipe—one that cretins like me could replicate with ease. Fortunately, shortly after I pitched this project to my editor, I saw a bunch of journalists tweeting about their go-to chocolate chip cookie recipes. Several of them linked to this one from a food blog called Dear Crissy, which reportedly produced crinkly, gooey, golden brown chocolate chip cookies every single time.
I also saw quite a few folks recommend this recipe, which is also printed in Claire Saffitz’s cookbook, Dessert Person. The recipe calls for brown butter, which is said to lend a complex, nutty, almost caramelized flavor to the dough.
In the end, I decided to base my experiment on a hybrid recipe that combined the two, which I’ve outlined at the bottom of this piece.
The methodology
Baking really is a science. Like I mentioned earlier, there are about a million variables you can tweak to produce a different chocolate chip cookie. But in polling the Takeout team, plus a few devoted baker friends, I found the greatest discrepancy in two variables: butter melting methods and refrigerating, or aging, the dough. Some colleagues preferred brown butter in their cookies, and some preferred melted butter; some preferred to age their cookies for 24 hours, and some suggested aging for up to 48.
With that in mind, I decided to bake two sets of cookies—a set incorporating brown butter, à la Saffitz, and a set incorporating barely melted butter, à la Dear Crissy. From there, I’d divide each set into five batches, aging them each for the following durations: no aging; one hour; 24 hours; 48 hours; and 72 hours. I also decided to replicate each batch twice to ensure consistency. In total, I’d make 20 batches of 20 cookies, or 400 cookies (most of which were delivered to people in my apartment building to compensate for my constantly screaming beagle).
To ensure consistency, I employed the following methods:
- I double-checked my oven temperature with an oven thermometer, which I recommend you do if you haven’t already. Mine runs pretty accurately, but most renters aren’t that lucky. If your oven runs hot or cold, you can adjust the temperature accordingly.
- I measured all my dry ingredients with a food scale. If you don’t have a scale, be sure to fluff your flour with a fork before measuring it, then spoon it into the cup before leveling it out. Don’t scoop it straight out of the bag, which could result in a lot more flour than you actually need.
- I cooled all the butter completely before incorporating it into the dough. Failing to completely cool your butter results in serious dough spread and, on some unfortunate occasions, an unpleasant density and lack of cragginess.
- I baked everything on parchment paper. Parchment paper = easy clean-up and an evenly baked cookie.
The ageless cookie: Not the move, ma’am
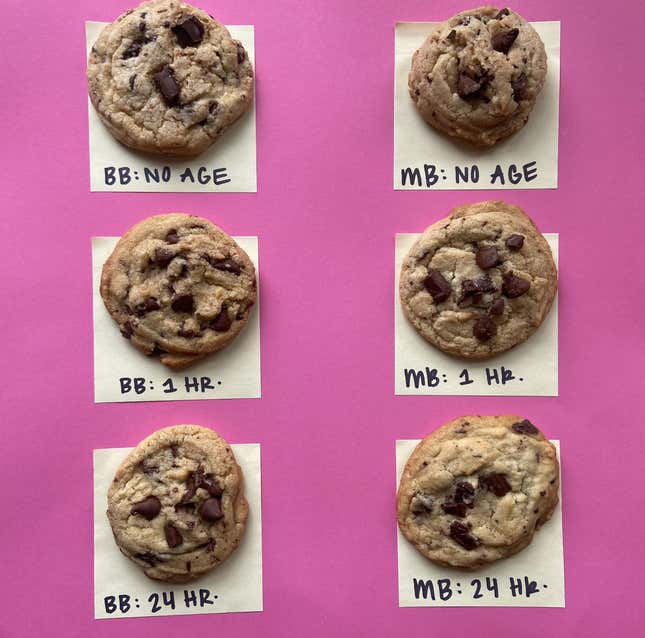
I skipped aging entirely for my first two batches, baking the cookies immediately after the dough was prepared. As you can see in the photo to the left, the results were just fine. Ultimately, failing to age the cookies meant slightly paler, less crinkly cookies, all of which varied pretty widely in consistency and spread. I wouldn’t recommend going this route—which is funny, because very few popular chocolate chip cookie recipes mention aging at all. Is this just something you learn when you grow up with a cute cookie-baking grandmother? I don’t know, but it’s time to start the conversation. I should also point out that the unaged brown butter cookies didn’t spread at all, resulting in a weirdly dense drop cookie appearance. Next!
The one-hour cookie: The Lord’s cookie
This is the one. This is the one. For these batches, I formed my cookie dough balls, covered the baking sheet tightly in plastic wrap, and chilled them in the fridge for an hour. I was a little worried when I pulled these puppies from the oven—though the edges were a gorgeous golden brown, the cookies looked puffy and underdone. I heeded the Dear Crissy recipe and let the cookies rest on the cookie sheet for 10 minutes while I went to the bathroom to stare at my pores. When I came back, I released a tiny “holy shit.” The cookies, pictured left, were perfect. Perfect level of browning, perfect crinkly tops, perfect gooey center. The brown butter hour-aged cookies had a very similar appearance, although, to be honest, I didn’t notice a huge difference in flavor. All four batches (two melted butter, two brown butter) turned out beautifully.
The 24-hour cookie: Also very agreeable
Next, I repeated the same process, just aging the cookies for 24 hours instead of one. The 24-hour melted butter batch turned out almost exactly the same as the one-hour melted butter batch—that is to say, aging them overnight didn’t produce a discernible difference in taste or texture. The brown butter batch, on the other hand, did seem slightly drier and crumblier after 24 hours of aging. That makes sense because, as Kenji writes in his Serious Eats piece, brown butter adds no moisture to dough: sugar that is mixed into browned butter cannot dissolve and makes it “subsequently more difficult for them to melt into each other as the cookie bakes.” Kenji has a very clever egg trick that helps preserve the flavorful nuttiness if you want to use brown butter—but I won’t explain that here, since I didn’t use the egg trick for the sake of consistency. You should go read his piece, though. It’s outstanding. Either way, if you’re absolutely sold on using brown butter, don’t bother with an extended aging process.
The 48-hour cookie: You can—but should you?
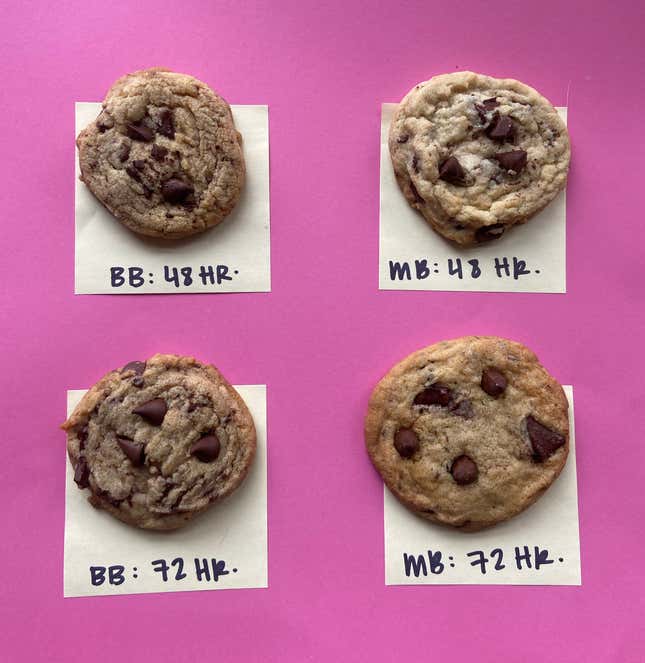
After aging for 48 hours, the brown butter cookies had dried out quite a bit. Like I mentioned above, long-term aging isn’t a great option for brown butter batches as they dry out quicker than other doughs. There wasn’t a huge difference in the texture between the 24-hour aged melted butter batch and the 48-hour aged melted butter batch, although the 48-hour batch did spread a tiny bit more. However, the 48-hour batch certainly didn’t taste any better than the 24-hour batch. That makes me wonder: why deprive yourself of cookies for 48 hours when you could have them much sooner? I don’t see a reason to age your dough for 48 hours unless you’re in a time crunch. That said, making your dough two days in advance of baking is perfectly acceptable if you’re going with the melted butter variation.
The 72-hour cookie: Not worth the wait
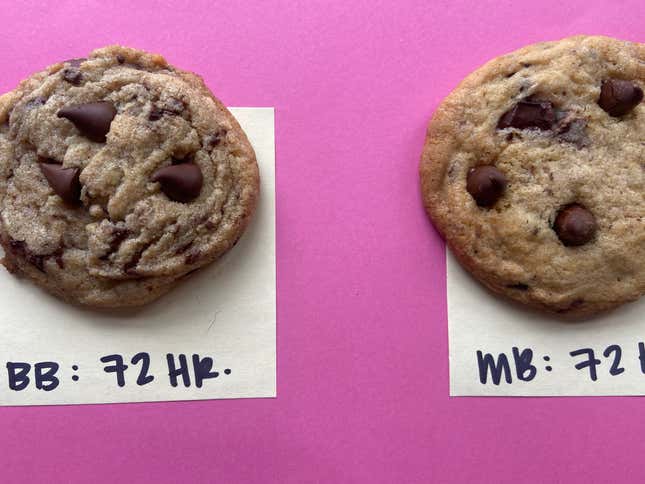
Both the Saffitz recipe and the Dear Crissy recipe say that you can age your dough for up to three days, or 72 hours. But should you? I tried it, and I wouldn’t recommend it. Actually, consider this my official petition to limit cookie aging to 48 hours at most. Both my 72-hour-aged brown butter batch and 72-hour-aged melted butter batch came out irregular, slightly dry, and unpleasantly crispy. These cookies also didn’t last very long; where I was able to preserve every other batch in a tightly sealed Tupperware container for up to a week, these cookies were hard and borderline inedible after only 24 hours. Both variations had been completely zapped of moisture by all that time in the fridge.
The result
400 cookies later, I found exactly what I was looking for: a recipe that I can follow to the letter to produce perfect chocolate chip cookies time and time again. My favorite variation was the hour-aged melted butter batch, although I certainly wouldn’t kick the hour-aged brown butter batch out of bed. Ultimately, browning my butter was an unnecessarily time-consuming step, so I probably won’t be doing it again. That said, if you’re all about the brown, stick with the hour-aged variation to keep your dough nice and moist.
Almost Certainly Foolproof Chocolate Chip Cookies
- 2 cups (260 grams) all-purpose flour
- 1 tsp. baking soda
- ½ tsp. salt (I didn’t have Diamond Crystal on hand, so I used regular ol’ Morton Kosher Salt; if you use Diamond, add a bit more.)
- 1 cup (2 sticks or 226 grams) semi-melted or brown butter, cooled completely (see note below)
- ¾ cup (160 grams) light brown sugar, packed
- ⅔ cup (119 grams) granulated sugar
- 2 tsp. vanilla extract
- 1 tsp. apple cider vinegar
- 1 large egg
- 1 cup (170 grams) semisweet chocolate chips
- 1 cup (170 grams) roughly hand-chopped baking chocolate
First, buy yourself a ticket on the Butter Train.
Your butter should be the first thing you mess with, since it needs to cool completely before you incorporate it into the dough. There are two roads you can go down here:
- Brown the butter: This is a lot easier than it sounds. Just start melting your butter over medium heat, swirling the pan from time to time. You’ll see the butter start to foam; at that point, keep stirring until the color progresses from yellow to tan to toasty golden brown. Transfer it into a heatproof bowl to cool completely, which could take a half hour or more.
- Kinda, sorta melt the butter: I clocked this technique in the Dear Crissy food blog recipe, and it worked great for me. You want barely melted butter, which means you can pull the butter right out of the fridge, plop it in a microwave-safe bowl, and melt it until you have several butter solids swimming in a gorgeous lake of melted butter. Let that cool completely before advancing to the next step.
Then, mix your dries and wets.
In a medium bowl, mix the flour, baking soda, and salt.
In a large bowl, beat together the (cooled!) butter, sugars, vanilla, and vinegar until smooth. Beat in the egg just until combined, then mix the flour mixture into the wet mixture just until combined. Fold in both types of chocolate.
Chill, baby, chill.
Using a large cookie scoop (mine is only about 1.5 rounded tablespoons—I’d recommend going a little larger than that), drop cookies about two to three inches apart onto a parchment-lined cookie sheet or plate, whatever fits in your fridge for chillin’. Cover the dough tightly in plastic wrap, then chill for at least one hour up to about 24 hours.
When you’re ready to bake, preheat your oven to 350 degrees Fahrenheit, and (if you haven’t put your cookies on a baking sheet already) line a baking sheet with parchment paper and plop your chilled cookie dough balls onto the sheet.
Bake for 8 to 10 minutes. The cookies should look golden brown around the edges and underdone and puffy in the center. Don’t freak out! This is good. You want this. Remove the cookies from the oven and let them sit on the sheet for about 10 minutes before moving them to a cooling rack. They’ll finish cooking on the sheet, settling into a gorgeous series of crags and crinkles. For best results, I recommend topping your just-baked cookies with reserved bits of chocolate and a sprinkle of sea salt.